So you got that new DSLR to take better photos of your kids, and sometimes the shots turn out great and other times, they just don’t.
Well, I thought I would share how I set up my camera for shooting sports. These same settings are also helpful for just chasing anything moving.
In this Part 1, I will discuss the 3 variables of exposure:
Aperture – the size of the opening of the lens (the lower the number to wider open the lens)
Shutter Speed – how long the shutter is open exposing the sensor to light (the larger the number the faster the speed (200 = 1/200 sec)), and
ISO – how sensitive the sensor is to light (the higher the number, the more sensitive the sensor, and less light is needed).
These 3 variables make up a particular exposure. If you fix 2, then the third has to vary with the exposure. With action, you will tend have a target aperture and shutter speed, so the ISO gets moved around for the varying lighting conditions.
To get consistent results you will need to take a little more control of your camera and get away from the AUTO or the PROGRAM modes. I typically shoot in Aperture Priority mode, and vary the ISO to get the shutter speed in the range where I want it. At night, I use manual.
Aperture
I will usually set my aperture as wide open as my lens will allow to get a blurred background for my shots. The only time I have to vary this is in really bright light. In bright light, the shutter speed may hit the maximum which is 1/8000 sec for my camera. In these cases, I will close down the aperture just enough to get the shutter speed in the 1/1000 to 1/5000 sec range.
Shutter Speed
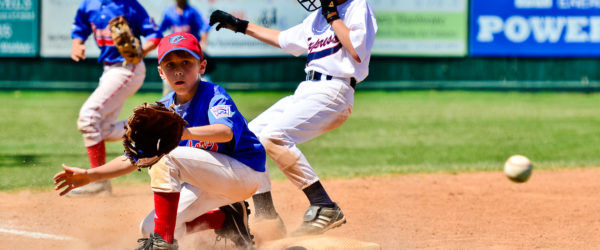
To freeze most motion you need to have a shutter speed of at least 1/1000 sec. In low light conditions, you have to make some compromises. I will go down to about 1/400 sec at night, but at this shutter speed, the faster moving parts like the bat, ball, and hands are blurred.
Here are a couple of examples below 1/1000 sec:

|

|
| Day Shot Settings: f2.8, 1/800 sec, 800 ISO | Night Shot Settings: f2.8, 1/400 sec, 3200 ISO |
ISO
I usually leave the ISO at the default of 200 (for my camera), but in bright light I will lower it to try and keep the aperture wide open and the shutter speed within range.
In lower light, I increase the ISO up to a maximum of 3200 ISO. There are higher settings, but I find the noise too much above 3200 for my camera. Each camera will have its own limit.
AUTO-ISO
I have a Nikon D7000, and I can change the ISO with the sub-command dial quickly with a custom setting. If you have one of the entry level DSLR’s, the ISO adjustment may not be as easily accessible, and you will want to use AUTO-ISO. For AUTO-ISO, you input a minimum shutter speed, and a maximum ISO. I recommend using a shutter speed between 1/400 sec and 1/1000 sec minimum and a maximum of 1600 ISO unless you have a D7000, or newer full frame DSLR.
Noise
As the ISO goes up, there will be more noise in the image especially in the shadow areas of the image. For the entry level Nikons and Canons you can go up to around 1600 before the noise gets distracting. You will need to have noise reduction turned on in your camera if you are shooting jpeg, or you can clean it up in a processing program like Adobe Lightroom or Apple’s Aperture. For the D7000, I have good results up to 3200 ISO with noise reduction in Lightroom.
The next important step in action shots is to get the autofocus set up right. That will be the topic of next week’s post.